
Lesson 1: Introduction to Geometer's SketchPad
 Basics
For these exercises and investigations you will need to be able to use the
basic features of Sketchpad. You will get a brief introduction in class to
the construction of straight objects and of circles. You will see how to
select one or more objects that have already been drawn and how to
use some of the built-in constructions, particularly mid-points,
perpendicular lines, parallel lines, and angle bisectors. These are the
basic elements for creating Sketchpad sketches. Be sure to practice them as
much as possible during these exercises.
 Exercises
- Open a new sketch. Use the segment tool to draw a triangle, a
quadrilateral, and a pentagon.
 You should be able to drag any of the vertices or edges of these figures
to dynamically distort them.
- For each of these figures, select all the edges and use the Construct
menu to construct the midpoints of the edges. Then join these mid-points
to create a new triangle, a new quadrilateral, and a new pentagon. Change
the color of the edges of these new pentagons so that they stand out from
the originals.

- Open a new sketch. Draw a hexagon using the ray tool so that it
appears as a sort of pinwheel.
Place additional points on each of the extended sides, outside the
hexagon. Use the label tool to label tool to label your points as shown
below. The rays will not appear with arrows in your Sketchpad sketch.
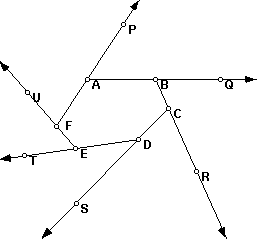 Measure each of the angles PAB, QBC, ... , UFA and
compute the sum of these angles.
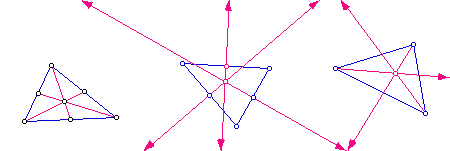
- Open a new sketch. Draw three triangles using the segment tool. In
one triangle, construct the centroid (intersection of the medians); in one
triangle construct the circumcenter (intersection of the perpendicular
bisectors of the sides); in one triangle construct the incenter
(intersection of the angle bisectors). Show the objects drawn to complete
the construction (medians, perpendicular bisectors etc. in a different
color than the original triangle.
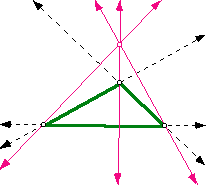
- Open a new sketch. Draw a triangle using the line tool. Use the
segment tool to draw the triangle itself using a different color.
Construct the orthocenter (intersection of the altitudes). Make sure that
none of the altitudes disappears if you drag a vertex to distort the
triangle.
- Open a new sketch. Construct a segment AB. Use the circle
tool to draw an equilateral triangle ABX.
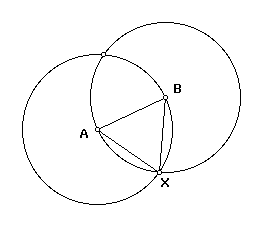 Make sure that when you
drag either A or B the triangle remains equilateral. What
happens when you drag X? Does this make sense?
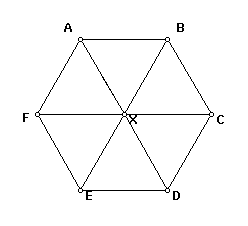
Construct five more equilateral triangles around X, creating a
regular hexagon ABCDEF then erase all
the circles you used to create them.
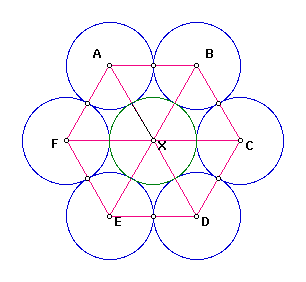
 Construct seven congruent, tangent circles, centered at A, B, C,
D, E, E, X.
-
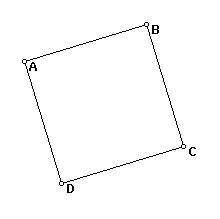
Open a new sketch. Construct a segment AB. Construct a square
ABCD with this segment as one of its sides. Make sure that it
remains a square if you drag either of A or B.
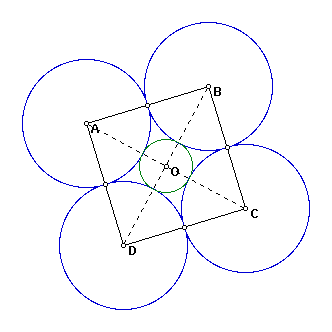
 Construct the center, O, of this square and then construct mutually
tangent circles centered at A, B, C, D, and
O.
 Investigations
- Open a new sketch.
- Construct a circle.
- Construct a triangle ABC with each of its vertices on this
circle. Do not use the pint that determines the radius as one of these
points.
- Measure the size of angle ACB.
Drag C around the circle. How many different values do you see for
the measure of angle ACB? Is there a relationship between the two
values you see? Move A to a different place on the circle and repeat
this exercise. Do your conclusions still hold? Write your conclusions in
a text box on the sketch.
- Open a new sketch.
- Construct a quadrilateral ABCD using the segment tool.
- Construct the midpoints P, Q, R, and S, of
the sides AB, BC, CD, and DA respectively.
- Construct the quadrilateral PQRS determined by these points.
Use a different color for the sides of PQRS
Drag any of the vertices of ABCD to alter the shape of this
quadrilateral. No matter what shape this is, what appears to be true
about the quadrilateral PQRS? How would you verify this with some
constructions and/or measurements? Try this. Can you prove your result?
Write your conclusions in a text box on your sketch.
- Open a new sketch.
- Construct a triangle ABC.
- Construct the centroid and label it X. Hide the medians.
- Construct the circumcenter and label it Y. Hide the
perpendicular bisectors and the midpoints.
- Construct the orthocenter and label it Z. Hide the side
extensions and the altitudes.
- Construct the segment YZ
Where does the point X lie relative to the segment YZ? Does
this relationship change when you alter the shape of the triangle
ABC? Is the centroid, X, always between Y and
Z? Measure the lengths YX and XZ, then calculate
their ratio. What happens to this ratio as you alter the shape of
ABC? Write your conclusions in a text box on your sketch.
- Open a new sketch.
- Construct a circle, then a triangle ABC,
with each of the vertices A, B, and C on the circle.
Do not use the point that defines the radius as one of these points.
- Construct a new point P on the circle.
- Construct lines that extend the sides of ABC and then construct
points X, on line AB, so that PX is perpendicular to
AB, Y on line BC, so that PY is perpendicular to
BC, and Z, on line AC, so that PZ is
perpendicular to AC.
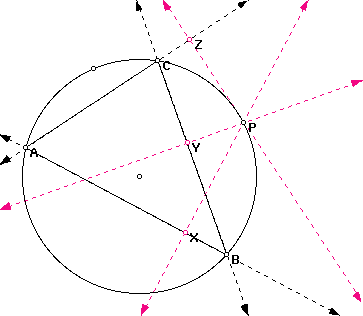
- Hide the side extensions and the perpendiculars, but leave the points
P, X, Y, and Z on the sketch.
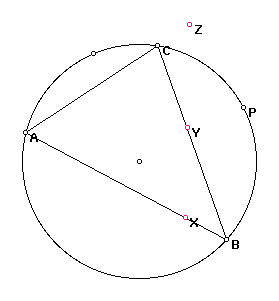
- Construct the line through X and Z. Make it a different
color than the circle and the triangle.
Where does Y lie in relation to this line? Does this change as you
alter the shape of the triangle or the size of the circle? Can you move
A around the circle until Z coincides with C. In this
case, where is X? Can you explain why this happens? Write your
conclusions in a text box on the sketch.
 Homework
Hand in electronic copies of your completed investigations. Make sure your
name is on each individual sketch.
Back to the
Workshop Outline
On to
Lesson 2


 Basics
 Exercises


 Investigations

 Homework